
PLANNING
I chose this problem because I love the visual nature and the puzzle-like feel to it. I think the visual clues will help students better understand the concept of area. The ideas of ratio and relationship are important here because it’s impossible to get the answer to this question without comparing the different sizes of squares of different colors. It was also easy to pull in the concept of area as sort of an anchor to bring the other aspects of the question together. This image came from an email sent out by Stanford mathematics educator Jo Boaler as a conversation starter – “What kind of math questions can we generate from an image like this?”
I want my students to have a better understanding of area as a concept of something measured in square units. By giving one square foot for each of the small blocks, it helps to reinforce that idea. Also, using ratio can help to strengthen the idea that geometry and algebra are based on relationships and how those different quantities relate to each other. It’s impossible in this problem to get any of the answers by only looking at the relationships of the different sized squares.
HOW I SOLVED THE PROBLEM
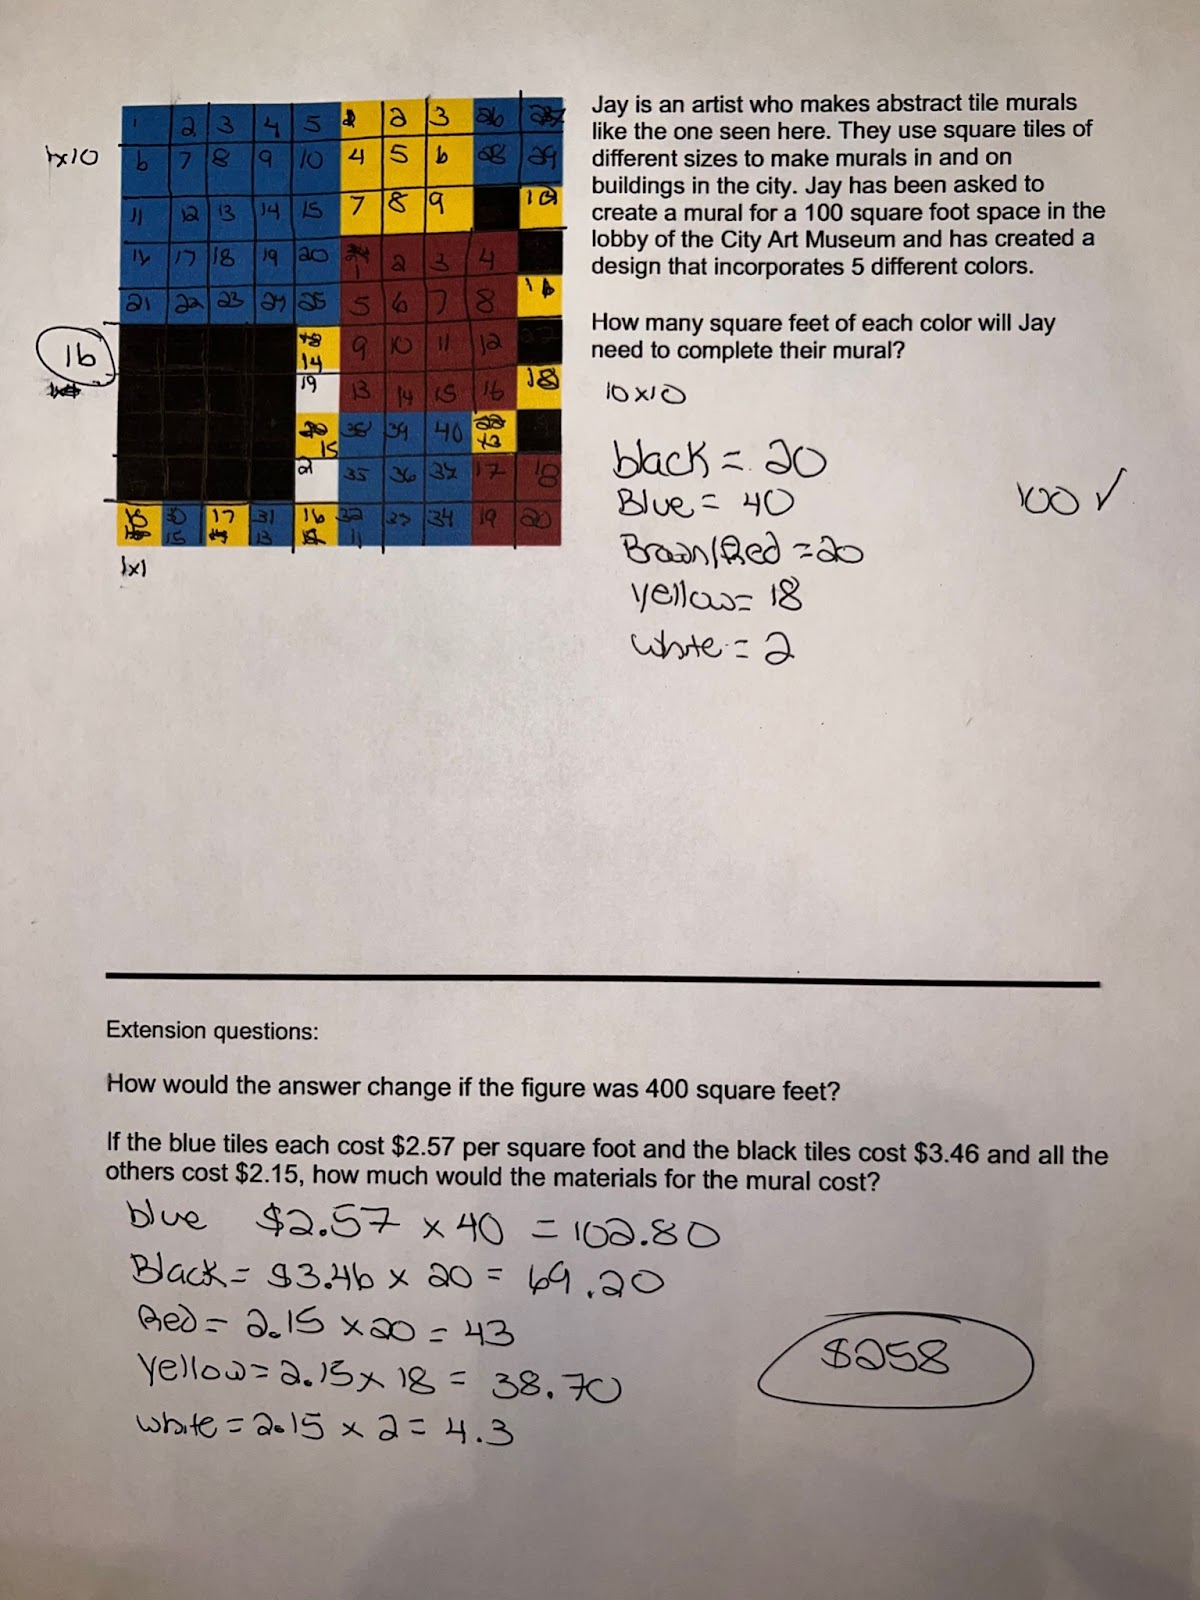
For me, I used the 100 square feet total to figure out that each side of the figure is 10 feet. After that, there are lots of ways to approach the problem and different ways to start. If you use the center of the picture (the 3 yellow squares, 2 white squares, and 1 big blue square), you might see that the yellow and white squares are five feet in length, which would mean the large blue square also has to be 5 feet in length. Since it is a square, that would make it’s area 25 square feet. Another approach is to look at the right side of the picture. There are 3 yellow squares, 3 black squares, a slightly bigger blue square and slightly bigger black square that all need to add up to 10 feet. That might help you to establish a baseline for the different sizes of each square. If the 3 yellow square and 3 black squares are six feet in length, then the remaining 4 feet have to be divided up between the lengths of the slightly larger blue and red squares. However you establish that each small square is 1 square foot, once you do the area of each individual square can be solved with a simple area (l x w) problem. Students can use the totals of numbers that they come up with to then create ratios of the colors.
So:
- 40 square feet of blue tile
- 20 square feet of black tile
- 18 square feet of yellow tile
- 20 square feet of red tile
- 2 square feet of white tile
ANTICIPATING STUDENT RESPONSES
Before I tried it with my class, I did some brainstorming around how my students might try to make sense of the problem. Here’s what I was thinking… Students could use horizontal or vertical lines throughout the picture to establish a baseline for individual sizes of squares. They may also be more comfortable with the concept of area and start with the black 4×4 square. I think that my students will try to use the right hand side most frequently because it allows them to count 6 individual blocks and then figure out the 2×2 on the top and bottom. The black 4×4 square would also be a good starting point because it has individual blocks to the right and on the bottom, giving it a clear 4×4 layout.
I think that the students will have a pretty easy time understanding the right side of this diagram because it’s six 1 foot lines and two 2 foot lines. The challenge will come when they are asked to figure out the larger square’s areas. These figures require relating the smallest squares to ones slightly larger and then repeating the steps again.
SUPPORTING STRUGGLING STUDENTS
I planned to give students time to struggle on their own. I also planned some questions I could ask them to help keep their struggle productive. I thought I could ask them to figure out the area, or even just side length, of the squares in the top right and bottom right corners. Once those measurements were better understood, the students would hopefully see how the squares relate and be able to transfer that onto the other squares in the image. If it was still not clicking, I might use the black square in the bottom left hand corner and ask for the side length and area to give them some momentum and information to use to find the area for each color.
SUPPORT CARDS
Support cards can be printed and cut out before class and given to students who need a hint, to give them help (but not too much help). Here are some support cards you can give your students as they work on the Mural Problem.
PUSH QUESTIONS
Push cards can be printed and vut out before class and given to students to keep them engaged in the problem and to keep them challenged once they have made sense of the original problem. Here are some push cards to cut out and hand to students to keep them engaged in the Mural Problem once they have completed the initial task. (If you use any of the cards that ask students to create their own designs, have graph paper, colored pencils, markers, technology available to students.)
ANALYZING STUDENT WORK
Student 1:

This student was having a hard time with the problem as they had recently come back to class after a long time away. At first, they were using the numbers that they found in the problem and trying to manipulate them to help them get the answer (the circled section of the problem.) After they didn’t receive any feedback correcting them or confirming their answer, they continued to struggle through, again, using the numbers that they gleaned from the problem itself.
After some prompting about the overall dimensions of the mural and how we might break it down, the student understood the problem could be placed on a grid and broken down into multiple 1 x 1 squares. They started to grasp what the actual problem was that they were working to solve (as evidenced by the area numbers above the figure.) However, without carefully drawn lines, the vertical lines on the right side and at the top caused confusion because they weren’t precise and often created individual squares containing 2 colors.
The main support I offered this student to help them was to ask “is there a way that you can break down the bigger squares into smaller squares?” Once they thought about that, they started to draw lines, which helped them process, but still presented problems in the solution.
The sample shows the initial struggle that the student faced and their way of attacking it really well. Working with the numbers provided in the problem enabled them to attack and use the skills they felt comfortable with, but ultimately didn’t result in any success. However, when they were given a small nudge (suggesting that they break down the bigger squares,) they moved quickly into attacking the problem in a whole new way and with more confidence.
I thought this student’s work showed some of the habits that we work to instill in our students, namely the ability to use the information given to try and solve the problem, but also how a small nudge can often propel a student in an entirely different direction, often with a renewed sense of optimism.
STUDENT 2:

This student spent a lot of time, initially, looking at the figure and rereading the problem. As an English language learner, they often spend more time on word problems reading and rereading to ensure that they are understanding the problem first. They are often unwilling to get started without support and encouragement, so I offered the same prompt as above, “How can you break down the bigger squares to make the problem simpler?” Once they had that prompt, they started working diligently through the problem.
They ran into some issues when they drew their vertical lines. Their horizontal lines are perfect, but when there weren’t guides for each line in the form of small, 1 x 1 squares, they were thrown off. They also struggled with the multiplication and addition aspects of the problem.
This student had a ruler and used it to draw their lines, showing a desire for precision and a good use of the small individual squares. Despite that, the vertical line just right of center shows that, had the student done all the multiplication and addition correctly, they still would have come up with some incorrect answers. This student also showed good aptitude and understanding of the second extension question, but didn’t have enough or the correct information for the first part of the problem to solve it, but they worked through the part of the problem that they felt comfortable with.
STUDENT 3:
This student did excellent work with the problem. What can’t be seen from this work is the struggle to start that this student experienced. For the first 6 minutes or so, this student sat and read the question and had no idea what to do to begin this problem. When I asked the class, “what shape is the entire mural? And based on the information in the problem, what might the dimensions be?” It was like a lightbulb went off and they just went to work. Once this student drew the lines using the 1 x 1 squares on the right side and at the bottom, it helped them to understand that the entire shape was a 10 x 10 grid, they went to work and solved the problem efficiently.
I chose this problem specifically for the unique approach that this student used for solving the problem, numbering each box of each color as they went through the whole mural. It’s a good example of how this problem, at its simplest, is a counting problem, but that we often use area as a means to simplify a problem like this. Even with the precise lines and the solid strategy, there are a few squares in this student’s work, namely in yellow, where even the counting can become problematic.
Looking at the extension questions here, it’s interesting to note that the students skipped the first question and spent time doing the second one, despite the fact that it was significantly more work. More time in class spent on writing and talking about math could give the student more confidence in writing about this type of problem.
REFLECTIONS
What stuck out to me most, in terms of my own learning from this problem, is how much math is patterns and pattern recognition. We began the class by simply looking at and talking about the image presented. I gave them a copy of the design without the problem and asked students “What do you notice? What do you wonder?” That discussion generated a lot of great comments like “I notice that they’re all squares” and “I notice that the whole thing is a square” and “Not all of the colors show up the same amount.”
Based on the responses given during the discussion part of the lesson, I was excited to see the students take on the problem. But when the problem was given, many of the students froze. The introduction of the words and the actual problem, despite the fact that we read the problem together, caused a lot of initial anxiety. Many of the students immediately began to work with and manipulate the numbers that were present in the problem, but only because they weren’t sure how to attack the problem.
After a little bit of prompting and discussion, namely, reminding the group that they had noticed earlier that the whole picture was a giant square and I asked “if it’s a square, what could the dimensions of the square be?” Once the students started to realize the dimensions, they were really able to break it down and understand each of the squares could be broken down into 1 x 1 squares. The biggest takeaway here for me was the impact that one small prompt can have on each student, but also on the mood of the entire classroom. When the students grasped that this problem was about solving an area problem and that they could count, the mood in the classroom changed significantly.
The biggest change is that I would implement this problem in the midst of a unit on geometry. Many of the students had been with me for a geometry unit months before, but we hadn’t reviewed area or geometry in depth in the weeks leading up to doing this problem in class. Giving this problem with as little context as I did led to a lot of frustration initially that could have been avoided by providing this in the context of the lesson that we were doing at that time.
Another change that I could make is to spend more time on the introduction of the problem. I showed the picture in class and we talked about what we noticed about the image itself, but not the problem. I’d leave the question off and provide the context of it being a 100 square foot mural to see what kind of conversation that generated. One other thing I might try is after I have students share what they notice about the design and the context, I might ask them to write their own math problems – “What kinds of math questions could we ask about this picture and this situation?”
One of the biggest challenges in the classroom is building up the frustration tolerance of my students. Often they simply refuse to work if they feel like they can’t get the answer. This problem really helped by showing them that one simple prompt or hint would give them the necessary information to move forward at least a little bit and, for some of the students, all the way through the problem. Having those prompts prepared ahead of time to slowly dole out when necessary to keep them moving was essential.
I think my students realized while working on this problem that complicated problems are doable and that they limit themselves by letting themselves be intimidated by the problem itself. It also reinforced the idea that visual representation is a good way to get around a barrier to solving the problem.
I think, again, that if this problem is given in the context of a geometry unit after the concept of area has been introduced that the success rate is much higher than if it’s given cold. One of the concepts that I feel solidified very intensely was the idea of determining dimensions and area by comparing different shapes and using what we know about one small shape to compare and determine the size of the others.
I also think their frustration tolerance increased when they saw that they could work through the problem piece by piece and work towards a solution. The feeling at the end of the class was encouragement and excitement to try again and accomplishment, but it was not as positive during the struggle portion of the lesson. Working through it and coming to the end and the answer was a big step in building that confidence.
The biggest challenge was, after talking through the dimensions and the class figuring out that the dimension of a square with 100 square feet of area had to be 10 x 10, some students were unable to draw the lines in the problem to help break down the problem. Even the work done by student one and two above shows that, even with the knowledge of a 10 x 10 grid, drawing the lines and setting up the problem correctly proved very difficult. The unexpected part was the lack of recognition that there were only 9 lines or that some lines created squares that contained 2 colors.
Based on what I saw in class, I think the best time to use this problem is a week or two after a unit on area once the concept has solidified and the students understand the underlying information.
The biggest success I had in doing this class was to have my prompts and how far each one would take me laid out before doing the problem in class. I knew that students would struggle with no prompting, so the first prompt was about what the total area was and what the dimensions could be. They also struggled with breaking down each square and putting the entire figure on a grid. I had graph paper handy, but the last prompt was to break down each of the squares into smaller units. Once students had this information, they were absolutely off and running.
Lastly, the discussion and “what did you notice?” portion at the beginning of the class helped some of the students who hadn’t done this work before feel engaged. It helped to have some of the higher students in the class model their thinking and point out some things that might help. Make sure that your higher level students don’t give too much information during this discussion, though. One thing that might help is if/when students notice that the design is made up of squares, ask them to explain how they know they are squares. It might also help draw out more background knowledge if you ask them to share a few things they know about squares.
Finally, because the problem is so visual, having graph paper, lined paper, rulers, tiles, and/or cubes on hand can help immensely! Here is a look at some of those tools in action:
A recreation of Jay’s mural design using tiles.

A drawing of Jay’s mural design using lined notebook paper and colored pencils.

A drawing of Jay’s mural design using graph paper and colored pencils.

Technology can also be useful in exploring this problem. We created three virtual versions of this problem, using three different platforms.
- The Mural Problem on Desmos – this version breaks the problem into four screens. The first has only the design and a prompt to record some things they notice. The second includes the context and asks students what new things they notice. The third asks them to generate some math problems inspired by the design and context. The fourth is the design with the prompt and the main question.
- The Mural Problem on the Mathigon Polypad – this version has the most virtual tools for students to explore the design, including rulers, virtual tiles, various drawing tools, etc
- The Mural Problem on Google Slides – this one is less for students to work on and more useful to project at the front of your class or to share a screen during remote instruction.
